Tuesday, 27 July 2010

Rip it Up and Start Again

The backscene is almost there; one more end panel to fit (where the cutting exits the scenic area). I've now turned my attention to some more scenery. I mentioned last time that the ground foam was coming up and I intended using grass fibres. The first steps were taken on the right-hand scenic board. The outer embankment and fields have been started:


Meanwhile the left hand board and the cutting are getting a radical make-over. Not only have I removed the ground foam, but the cutting has been reprofiled; the section behind the bridge has been improved. Additionally, I have made the gullies, especially the outer one, more pronounced. Now you can see why that last backscene panel hasn't gone in yet! When this section was originally constructed I used powdered plaster mixed and coloured to remove the whiteness. I find this Polyfilla type product awfully awkward to use; it's either to runny or too stiff, it likes to slip down embankments, and so on:


Now I am using a premixed lightweight patching filler, available from builders merchants in handy 2.5kg tubs. It is substantially easier to use and much lighter as well as being easier to carve/drill when solid.

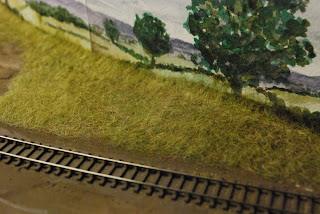
It became apparent when using the grass fibres that the base colour of the scenery played an important part in the end result. Much of the layout is darkish brown from spraying the track, but the embankments were pretty rough from removal of foam. I've being using varying colours of acrylic paints to underlay the fibres. The back of the goods yard is straight onto the sprayed brown:


Similar fibres on the field to the left are over a base of Raw Sienna and Burnt Umber and as a result seem much lighter:


With a little practice the static shaker (a cheap version from Greenscene) is remarkably easy to use. Progress is being made at a pleasing rate. I am also working on making off-scene tufts of grass and weed for subsequent "roughing-up" of the grass areas. More soon...

Tuesday, 20 July 2010

Can You Tell What It Is Yet?

Once more into the breach. Well into the study anyway. As you can see, the whisky has been replaced by coffee, but otherwise the song remains the same. These are the left-hand panels being finished:


Suitably dry, they're offered up to the backboard and trimming measurements taken:


The right-hand panels are already in place. Except for the curved bit at the end; that awaits a final piece of support on the outer face of the layout where the return curve is:


Two panels in place from tonight's efforts. It is important to let the panels dry before butting up the next one, to minimise shrinkage gaps; it's a bit like wallpapering your room:


The more eagle-eyed of you will notice some removal of ground cover. Foam flocking has been removed and this will be revisited with static grass; shaker gubbins were acquired at Oxford and flock is in transit as I type. More on that soon. I hope!

Wednesday, 14 July 2010

Paint it Back

Last night I made a start on the back-scene alluded to in the previous post. This will be watercolour on a fairly heavy and slightly textured paper. I will need to use two pieces of paper for each board, so there will be several joins. I will need to be careful that the painting over the joins is consistent and that the overall effect is fairly even. Here is the piece for the central board underway:

Monday, 12 July 2010

Better Late Than Never

Wow! That was good wasn't it? Expo, I mean. 50 years? It seemed like there were nearly fifty layouts.

Well done to everyone who contributed in whatever way.

Now I know, I haven't blogged for what appears like fifty years. But so much gets in the way of modelling sometimes. Suitably encouraged by Expo, where Brafferton performed reasonably well for much of the time, I press on.

For Oxford, I painted two part backscenes to relieve the mass of hardboard that would have otherwise formed the backdrop. On my return, I've started using these to sketch out what the backscene really ought to look like:


Also, the 04 finally got chipped and seems to be running well in it's new DCC state.

The legs on Brafferton were commented on quite a lot over that Expo weekend. These were substantially the idea of Edward who also helped with their construction. Indeed Edward and Alan Smith have contributed greatly to the legs and baseboard side of things on Brafferton; thanks for your support guys:


How long to the next blog? Soon, soon...

Saturday, 10 July 2010

Haromthwaite 2: Baseboard Assembly

Ok, nearly 17 months have elapsed since the first installment, but in mitigation I have been busy out on the circuit with 'Niddbeck Bridge', the 2mm Roadshow, helping to organise Golden Jubilee events etc. The recent brilliant Oxford Expo has also given me a kick up the arse and got me all fired up again!


The board 'kits' were assembled using aliphatic resin wood glue (Deluxe Materials Super 'Phatic) and a couple of joiners try-squares.


Some chisel-work then ensued to mortice-in the 51 x 28mm brass cabinet butt hinges (satin chrome plated). The screws were very near the inside edges of the ply sides so small thickener pieces were glued in place first. The hinges were fitted with sufficient knuckle projection to allow 2mm thick ply or MDF facia and backscene to be fitted at a later stage and still allow 180 degrees of fold.


Opposite each hinge position is a simple 8mm turned steel furniture male/female dowel for board to board alignment. These were epoxied in place.


To hold the boards together in the open position cylinder mortice magnetic catches with 6kg of pull are used and epoxied into place. As the layout is designed to sit atop a trestle table on the front of the 2mm Roadshow it doesn't really need anything more secure. 6kg of pull is sufficient force to hold the boards together during operation and easy enough to break apart for folding at the end of the session. Magnets will probably be also used to hold the boards together in the closed position but these will be installed at the same time as the facia/backscene panels.


Next up will be the 'fiddle sector plates' at each end. I am also conscious that I need to give some background information on the prototypes that are the inspiration for this little demo piece, and a track plan.