Having used steel rail and card-clad foamcore boards I was not happy about the 'put your ballast on dry and then soak it' approach. I therefore determined to use a quick drying adhesive and to apply the ballast on top of it. This was done in a centrally heated room to ensure the moisture had little chance to soak into the foamcore or rust the rails.

The North Eastern Railway commonly used ash ballast on its secondary lines, branch lines and sidings. This was perpetuated by the LNER and BR-North Eastern Region. Niddbeck Bridge therefore had to have a representation of ash ballast. For several years I have been experimenting with various proprietry brands of ballast. I eventually settled on a 50/50 mix of Woodland Scenics Fine Cinders and Busch fine black quartz sand, mixed in a large pudding basin with a balloon whisk (Mrs S went ape-shite - do not try doing this at your home!). This gives a satisfying dark, fine finish that I find pleasing to the eye (the pictures here show it quite a bit lighter than it really is. Real ash ballast can of course take on various hues, for instance when it is wet it appears much darker than when dry. It was the dark, damp look I was after and I'm fairly happy so far.

This is the adhesive I used, DeLuxe Materials 'Super 'Phatic', which is an aliphatic resin woodworking glue. It looks like a white PVA glue but is thinner, has a bluish tint and dries quicker. I built my foamcore baseboards with it and also laid my track with it. This particular size comes with a hypo needle applicator (see below)
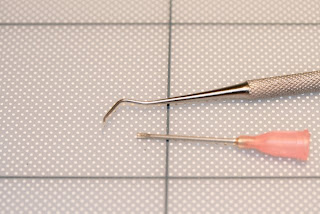
The tool at the top is a stainless dental type probe, purchased from Squires. I have modified one end to the shape shown (flat straight base with slight upturn at the end). The point has been blunted using a tool stone. I found this shape ideal for moving the aliphatic adhesive around between the sleepers and point timbering, and for working it under the rail. The flat straight base allows the adhesive to be worked into a neat straight shoulder with ease.
The tool at the bottom is the hypo needle applicator for the adhesive. As supplied, although very small bored, it does deliver too much glue at once, so I have gently squeezed and flared the tip in a vice, to the point where the tip of a scalpel blade will just fit in. This reduces the flow to a nice level. Care must be taken to clean the nozzle under a running tap frequently or it will block. 5 minutes is about all I could risk in a warm room. Blow it through to check it is clear before putting it away! A few spare applicators come in handy (via the Deluxe Materials online store).

My ballast application tool - the spoon end of a Tamiya paint tool. This allows small precise loads of ballast to be placed accurately.

The spatula end of the same Tamiya paint spatula/spoon. It is easy to dip this into a jam jar full of ballast mix and balance a 25-30mm long load on it. It is then moved to the location required, parallel to the rail, and tipped onto the adhesive.

This shows the aliphatic adhesive applied from the bottle using the modified hypo applicator. It is easy to work between the sleepers and point timbering with the hypo applicator.
This shows the aliphatic adhesive applied from the bottle using the modified hypo applicator. It is easy to work between the sleepers and point timbering with the hypo applicator.

This shot shows the glue evenly spread around the sleepers and up to to the shoulder mark, using the shaped probe tool. The arrow is to remind me where the uncoupling magnet is located!

This shot shows the ballast tipped/spooned onto the wet adhesive using the Tamiya paint spatula/spoon, to the point where no adhesive moisture can be see through the loose ballast. At this stage it is lightly tamped down with a finger tip and left to dry.
.

This shot is taken about 30 minutes later, after the adhesive has dried. The surplus is simply vacuumed away (the whole layout has only consumed about 1/3 of a jam jar of ballast mix - hardly worth the effort of trying to recycle the hoovered up surplus). A scrub with an old toothbrush follows to remove the less then well glued grains. Any patches that are a bit light simply get a further local applicaton of adhesive and ballast.
.
The track and ballast will need a gentle airbrushing with a matt varnish and dirty thinners mix in due course, to take the 'new' look off it. I will apply the other scenic dressings to the layout before doing this, so it can all be blended in nicely.

1 comment:
"Having used steel rail and card-clad foamcore boards I was not happy about the 'put your ballast on dry and then soak it' approach."
Could you have sealed the card surface first to avoid this problem? The results look very good and worth Mrs S's ticking off, no gain without pain!
Peter Whitehead
Post a Comment